31 May 2013

Corsage brainstorming - part 2

So yesterday I made my first official corsage and today I thought I would combine a bit of musubi technique into the making.

There is a way of gathering the obi to make a round petal so I applied the same technique on a piece of organza and then applied a couple of white roses.


Okay this picture does not do the corsage any justice at all!


That is much better.

Of course I could sew on pearls, add stamens, use different colours and generally bling it up!  

Maybe I should......

30 May 2013

Corsage brainstorming.

So I have been wondering about making corsages for a while but for some reason there was always a stumbling block. 

What do I do for the backing? 

Then it dawned on me, why don't I use chiffon or organza to create a soft fabric little nest for the tsumami kanzashi flowers?  Seriously why didn't this occur to me earlier? 

Anyway here is a quick peek.


Here I paired it with one of my white rose kanzashi but any kanzashi flower design can be use.  

I think a little bit more experiment is needed.  Maybe I could use some of my obi musubi techniques here.


29 May 2013

UPDATE on Retro Kimono

So I may have made this kimono back in February (click on this link to see details)


but I have finally gotten round to wearing it!

Between the weather and just being lazy I have been put off wearing kimono but today (29 May) I wore a kimono.  Why you may ask?  Well I am part of this event on Facebook

https://www.facebook.com/events/476950189043292/

It is organised by someone in Japan and it is basically like Kimono de Jack.  Giving people from all over the an excuse to wear kimono.

So my kimono outfit is as follow.

Kimono - the one above
Obi - Pale blue nagoya obi with red camellia 
Obiage - Golden yellow with hexagon woven into the fabric
Obijime - Graduated yellow and cream (one of my latest purchase)


23 May 2013

Black Rose Tsumami Kanzashi by Kitty Kanzashi


Kanzashi rose with a difference!

---Kanzashi Description---


* Colour - Black (customizable)
* Size - 6cm (depth) x 17cm (height) x 18cm (wide)
* Mount - hairband
* Suitable for all hairtypes and hairstyles
* Suitable for vegans!


They may not exist naturally in nature but that is the wonder of the tsumami kanzashi technique. You can bring to life black roses without a second thought and here they are!  This design came about because of my black lolita dress that I have made which is sitting on my Miffy (the mannequin) as we speak.

I was wondering what sort of hair accessory would be perfect for this dress and after a lot of thought, my mind always went back to roses!  But not just ordinary red roses but black ones.


So this would be perfect for a kuro, gothic or old school lolita who wants to add a touch of floral into their outfit or maybe a bride who wants to be different.  In fact you could just wear it as a floral accessory for everyday wear if you like!

---Other information---

This kanzashi will be custom made for you and normally take 2 days to make. If my work schedule prevents me from fulfilling this promise then I will make a shop announcement at the top of my etsy shop.

All of my kanzashi designs can be customised to your requirements so if you would like this kanzashi in a different colour then please do not hestitate to contact me. I am always happy to help you with your request.


If you are interested then you can either order it by sending an email to kittykanzashi@gmail.com or visit my etsy store.

10 May 2013

Ivory Bridal Kanzashi Hairband, Wedding Hair Flower, Bridal Hair Accessories


A wonderful bridal kanzashi for someone who wants something different for their special day


--- Kanzashi Description ---


* Colour - ivory (alternative colours available please convo for details)
* Size - 8cm (wide) by 11cm (height) by 3cm (depth)
* Mount - metal hairband
* Suitable for all hairtypes and hairstyles
* Suitable for vegan
* Made to order


This kanzashi has been designed so you can position the flowers as high or as low as you wish on your hairband. There by allowing you to place it anywhere you desire in your wedding hairdo.


Available now here!

https://www.etsy.com/uk/listing/150806289/ivory-bridal-kanzashi-hairband-wedding?ref=shop_home_active

1 May 2013

Making a Dress - A Simple Regency Day/Evening Dress

I have been pondering about making a regency dress for ages!

It is a perfect dress for the summer and since I am due to go to Austen and the Abbey event in July, I better get practicing.

Inspiration

There are loads of inspiration for this.  I just have to watch Pride and Prejudice and I am just overwhelmed with the desire.

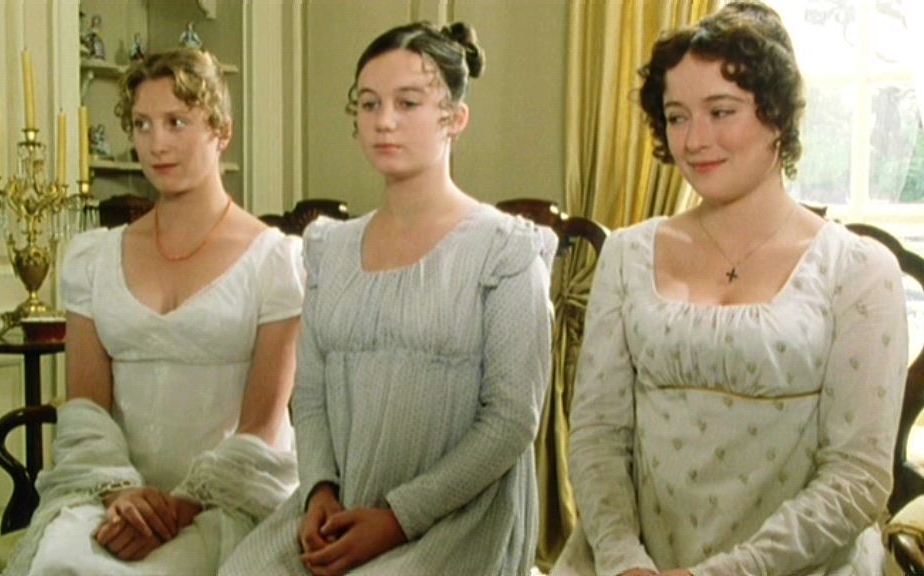
However I do want to aim for something like Jane's dress here.


But not as low cut and with some embellishment on the edge but I am undecided.

Fabric

For the fabric I decided to ask my good friend, Laura who has made regency dresses before and asked her what would be an appropriate cotton fabric to buy.  Of course muslin would be fantastic but that is just too loosely woven for me to use and it is see through which is not good for me and the british summer.

So she suggested cotton lawn and thus I brought 10 metres of cotton lawn.  Yes I brought 10 metres of it.


Do not worry, I am not planning on using all the fabric to make one dress.  Some of it is for another project which will be report next month.

Design Process

To save time and sanity I decided to buy a pattern and the one that I was recommended (again by Laura) was the Sense and Sensibility "Regency Gown Pattern".


I brought the e-pattern so I spent a good couple of hours piecing it all together but it was worth it and now all I have to do is trace the size I want.

With every new pattern, one must always make a toile to make sure the fit is at least okay.


Overall the fit was actually quite good but there are tiny things that will need to change.
  1. Gather more fabric at the top of the sleeve.
  2. Extend the bodice by 5cm so it sits under my bust.
  3. Generally gather the material more evenly.
So as you can see a regency gown is actually a simple garment to make.

Construction

So I have the fabric and the corrections have been made to the pattern.  Shall we begin?


 I am glad I have a huge floor to roll this fabric out!


 So far to good the bodice is done and the sleeves are lovely!


And we are done!  Here is the front and side.


And finally the back.  I do love the gathered back of this dress.  I will have to recreate that look on a different dress.  It just looks so elegant.