Showing posts with label dress. Show all posts

21 January 2018

Making a Dress - Wa-lolita wraparound JSK

Inspiration

So it is time I tackled my much wanted dress.  A wa-lolita dress that wraps around like a kimono.

This has been on my to-do list since I started to wear lolita over 4 years ago and really wanted to do it because it combined two of my favourite styles.  However it is a tricky style to pull off as it could look ridiculous if done wrong.

Therefore I spent a long time deciding on what element I wanted to show off on my dress and here was my conclusion.

  1. Collar
  2. Wrap around.
These two elements for me were the important elements that define a kimono.  Unfortunately I can not transfer the silhouette of a kimono outfit because that is a tube shape where lolita is more puffy so out with that.

Design

Now I have the elements I wanted to include, time to start start drafting.


Getting the collar was a bit tricky and additional darts were needed around the bust area to stop the top from gaping.


Not looking bad.


And now drafting the collar.

Construction

As always I started with the lining as if I made a mistake at least I can hide it.


And as always I forgot to take photos of the rest of the bodice as I was eager to complete to see what it looked like.


I finished the bodice Sunday evening when it dawned on me that I should add a mon on the back collar!

Therefore the following morning that is what I did.


Yep it is a little kitty!

Now to get the skirt sorted.


Checking the skirt was the right length.


Oh it is not a plain hem.  I had brought some broderie anglaise on a whim thinking it will definitely be useful and finally it was.  I did have some lovely cream/white trim but I wanted to keep it black.


Time to begin the skirt gathering.

Finished

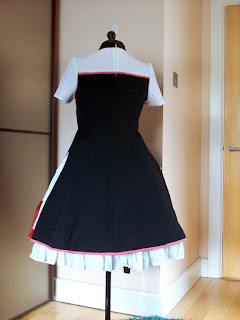
And here it is.


I have to say I am quite pleased with it. 


The collar turned out just as I planned.


Especially the back!  Just like a kimono collar it stands away from the neck.


Originally I was going to add a couple of buttons to hold it closed but I changed my mind at the last moment and took some inspiration from my haori/michiyuki and added these cute ties.


And another picture of my mon as it is so sweet.  Maybe I should add a bow and make it hellokitty.


Of course pockets.  How can a girl live without them.

Conclusion

I am very happy with this project and I would love to make this in real kimono fabric so I have something to look forward too.

I wanted to see how this would look with some of my haori/michiyuki.


With a lace haori.


My current favourite michiyuki.


And my all time favourite haori.

The biggest problem I have found is that they do not sit very well over my bell shape skirt which is a shame but this means that if I didn't wear a petticoat then these outfits would be perfect for work!

I definitely need to make a waist length haori so looks like another project needs to be added to my to-do list!

10 January 2018

Crafting and Sewing Review 2017

Hello all.

Things have been very busy since I last posted in October 2017 and unfortunately my blogging slipped.

However it is a new year and I will try my best to keep you up to date.

But before I do, I thought it would be be nice to summarise my year.

March 2017 - Lolita Apron Dress


April 2017 - Lolita Sack OP/Coat


May 2017 - Modern Jeogori and Hanbok


July 2017 - Qi-Lolita Overdress


August 2017 - Song Trousers, Hanfu top and Jacket plus Simple White Underskirt


September 2017 - Simple Black Underskirt, Sakura JSK


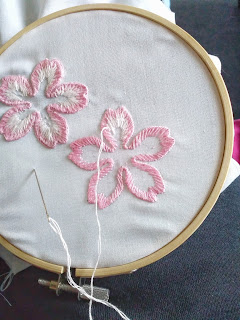
October 2017 - Stumpwork sakura and Wet Felting coin purse


November 2017 - More Wet Felting Coin purse

A post shared by Kitty Kanzashi (@kittykanzashi) on


December 2017 - Lolita Striped Brown JSK


Not too bad considering since I only sew on the weekends.

I think will continue to complete a sewing or crafting project per a month so as it is now January, I think it is time to look at my to do list and make another dress!

23 July 2017

Making a Dress - Qi-lolita Overdress

Inspiration

Now I have conquered my fear of wa-lolita it is time to turn my attention to qi-lolita.

Well it seems only fair that I do, since I am Chinese so it is a sub-style most suited to my culture.

Design

Luck would have it Otome no Sewing book 10 had two patterns for an qi-lolita overdress.  They are pretty much the same expect where the dress is split.

I went for the side split one.

Of course the book is recommending that I use chinese brocade but this would be a bit outrageous for work so I went for my trustworthy black bi-stretch but to add a little colour I would be using red lining and some red cotton trim.

Construction

During my shopping trip I could not find any decent red trim so I brought some white cotton trim that I liked and decided to dye it.  

Going well...


Unfortunately it is not as red as I hoped but maybe that is for the best.

Now to tackle the pattern.


Looks like I will need to add a little width as it is a little tight on my Miffy 2.  I want to be able to wear this at work and most importantly move.


There that should make it a little more comfortable to wear.

And then I forgot to take construction photos apart from when I finished sewing in the lining for the zip.


and sewing the armholes.


Sorry must try harder in future.

Finished

Ta-da here it is!


I have paired it with my cotton tiered undershirt but I plan to make another one that is easier to look after for work.


Closeup of the top part which still needs some button closure but I can't decide what style.


The back which involved a lot of hand sewing for the invisible zip because of my use of the lining.


Since it was such a plain overdress I went for a bright and colourful lining.


One slight problem is that my seams don't quite match up on the back.  I am always a millimetre out for some reason even though I take so much time to line them up.

Conclusion

I really enjoyed making this overdress as I have been wanting a qi-lolita outfit for ages.  I would like to make another one just because I love the look.

Although next time I will make the side slits a little shorter as they go right up to my natural waist!  So I have to make sure I wear a strappy top.


13 March 2016

Making a Dress - Red Skull Lace Kimono

When it comes to kimono making I just concentrate on the fabric since the construction is the same for all of them.

Therefore when I saw this fabric for sale on a FB fabric selling group, you bet I was going to make a kimono out of it.

However the fabric is very fluid so I will need to take my time making this one.

So first thing first cutting the pieces.


Who would have thought this would be a challenge.  So many adjustments and then readjustments just to make sure everything is straight.  However I managed it and to help with identification I rolled each piece separately.

Time to begin sewing the back seam.  I don't really need to do this but I did it because it makes the kimono look correct.  However rather then cutting the main body piece in two as it is normally, I just cut up to the middle and then sew the 1cm back seam.  Less risk of cutting wonky.

It dawned on me as I was cutting the lace that there was not a lot of fabric to create the marks.  What am I going to do?  Well the solution is sewing in bright neon yellow thread at the points.  So time consuming but it is a lot better then trying to draw a chalk or water soluble ink line.


I have to admit I have not put all the marks needed but we will let that slide.  Yep winging it as I go along.

Still it is nice working with this lace.

I got very absorb making this kimono so not a lot inbetween photos but here is the finished product.


Now to marvel at the work.