Showing posts with label lolita dress. Show all posts

21 January 2018

Making a Dress - Wa-lolita wraparound JSK

Inspiration

So it is time I tackled my much wanted dress.  A wa-lolita dress that wraps around like a kimono.

This has been on my to-do list since I started to wear lolita over 4 years ago and really wanted to do it because it combined two of my favourite styles.  However it is a tricky style to pull off as it could look ridiculous if done wrong.

Therefore I spent a long time deciding on what element I wanted to show off on my dress and here was my conclusion.

  1. Collar
  2. Wrap around.
These two elements for me were the important elements that define a kimono.  Unfortunately I can not transfer the silhouette of a kimono outfit because that is a tube shape where lolita is more puffy so out with that.

Design

Now I have the elements I wanted to include, time to start start drafting.


Getting the collar was a bit tricky and additional darts were needed around the bust area to stop the top from gaping.


Not looking bad.


And now drafting the collar.

Construction

As always I started with the lining as if I made a mistake at least I can hide it.


And as always I forgot to take photos of the rest of the bodice as I was eager to complete to see what it looked like.


I finished the bodice Sunday evening when it dawned on me that I should add a mon on the back collar!

Therefore the following morning that is what I did.


Yep it is a little kitty!

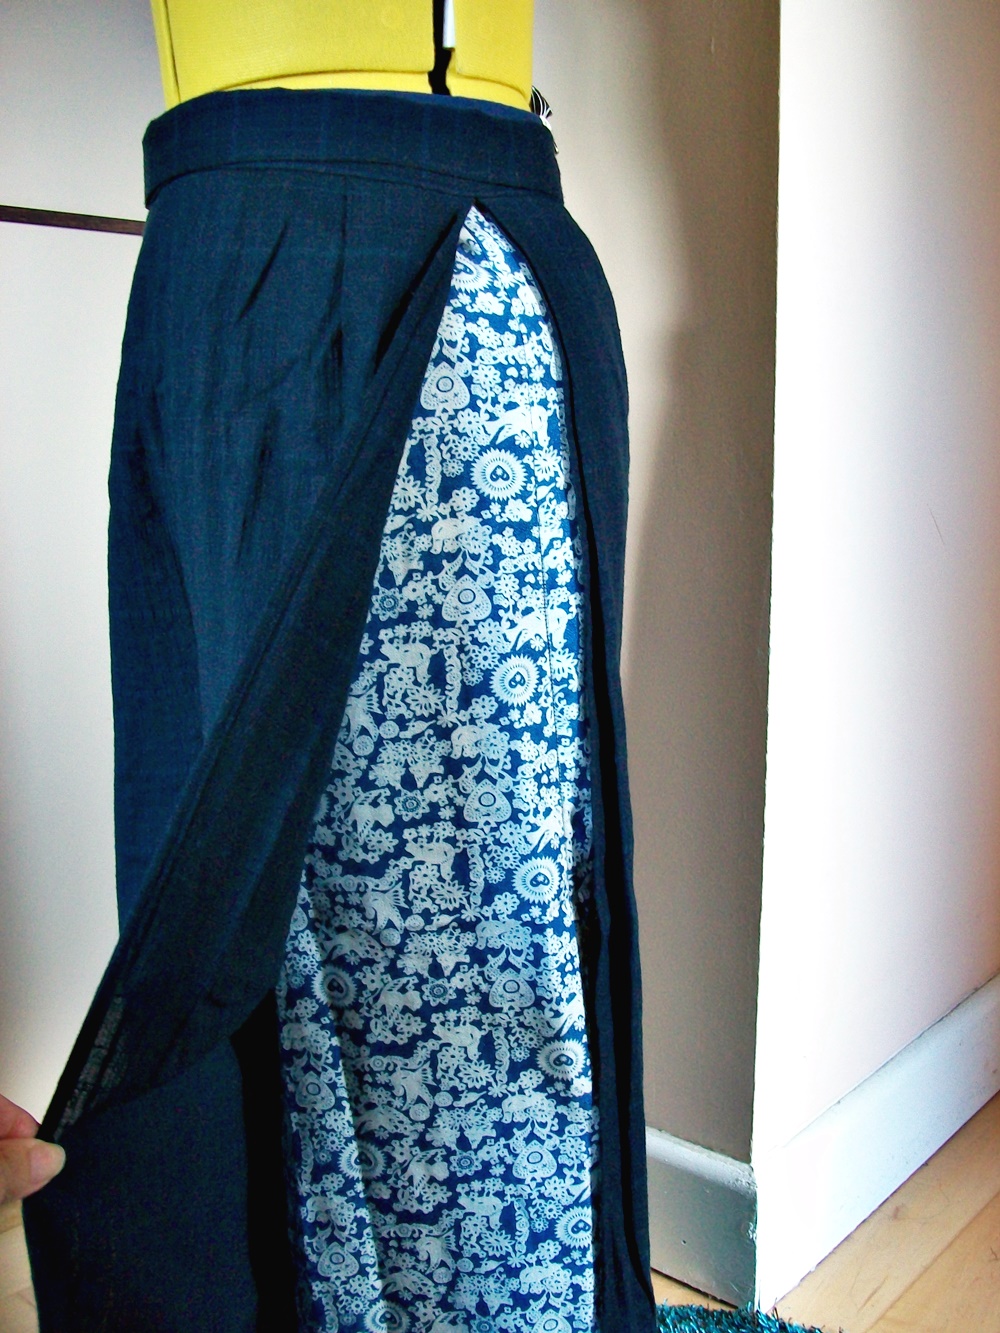
Now to get the skirt sorted.


Checking the skirt was the right length.


Oh it is not a plain hem.  I had brought some broderie anglaise on a whim thinking it will definitely be useful and finally it was.  I did have some lovely cream/white trim but I wanted to keep it black.


Time to begin the skirt gathering.

Finished

And here it is.


I have to say I am quite pleased with it. 


The collar turned out just as I planned.


Especially the back!  Just like a kimono collar it stands away from the neck.


Originally I was going to add a couple of buttons to hold it closed but I changed my mind at the last moment and took some inspiration from my haori/michiyuki and added these cute ties.


And another picture of my mon as it is so sweet.  Maybe I should add a bow and make it hellokitty.


Of course pockets.  How can a girl live without them.

Conclusion

I am very happy with this project and I would love to make this in real kimono fabric so I have something to look forward too.

I wanted to see how this would look with some of my haori/michiyuki.


With a lace haori.


My current favourite michiyuki.


And my all time favourite haori.

The biggest problem I have found is that they do not sit very well over my bell shape skirt which is a shame but this means that if I didn't wear a petticoat then these outfits would be perfect for work!

I definitely need to make a waist length haori so looks like another project needs to be added to my to-do list!

10 January 2018

Crafting and Sewing Review 2017

Hello all.

Things have been very busy since I last posted in October 2017 and unfortunately my blogging slipped.

However it is a new year and I will try my best to keep you up to date.

But before I do, I thought it would be be nice to summarise my year.

March 2017 - Lolita Apron Dress


April 2017 - Lolita Sack OP/Coat


May 2017 - Modern Jeogori and Hanbok


July 2017 - Qi-Lolita Overdress


August 2017 - Song Trousers, Hanfu top and Jacket plus Simple White Underskirt


September 2017 - Simple Black Underskirt, Sakura JSK


October 2017 - Stumpwork sakura and Wet Felting coin purse


November 2017 - More Wet Felting Coin purse

A post shared by Kitty Kanzashi (@kittykanzashi) on


December 2017 - Lolita Striped Brown JSK


Not too bad considering since I only sew on the weekends.

I think will continue to complete a sewing or crafting project per a month so as it is now January, I think it is time to look at my to do list and make another dress!

Making a dress - Brown striped JSK

Christmas holiday is a time for relaxing and stuffing myself silly with food however it is also a good time to sew!


A long time ago I made this lovely blue apron dress which I regularly wear for work as it is so cute and I thought it was time to make make another one but a bit more jsk-like.  Which means I fully lined it and sewed up the back of the skirt so I don't have to worry about wearing a underskirt any more.

So I dug out my old pattern from my shelf and started to prep my fabric.

Normally I would wash all my fabrics but I am once again using kimono fabric and unfortunately I forgot to jot down the fibre used to make this bolt so I decided against washing it and just steamed iron it to death.  I will be using a synthetic lining and from the crisp feel of the kimono fabric I have a feeling it is not natural so hopefully if I do need to wash it, it will not shrink.


This bolt came with a label but alas I don't know what it says so if you do let me know!

I started off with the lining as I had a lot of the material so if I made any mistakes I can make alterations.


And now to measure and cut my kimono bolt.  Which is always nerve racking....

So once I got over my hesitation I had the outer fabric cut and then I suddenly had a bodice.


With buttonholes!


Of course the next thing to tackle are the ruffles.


But I knuckled down and after an solid morning work I have it all sewed, gathered and attached to the skirt.


Then attached the skirt to the bodice and then attaching the lining to the skirt at the waist.


 This had to be done by hand which didn't take to long but there was a lot of fabric.

Finished

And here it is.


Yep that is one big bow!


I even dipped into my lace collection and added some detail to the bodice.


And the pockets as well as I thought they needed a little pick me up.


Oh and of course some more lace along the bottom.  This was the lace that I brought back in April 2017 when I went to Hong Kong.  


And I had to find some matching buttons for this jsk.  I went for something brass like since the dress is brown.

Conclusion

This project went relatively smoothly and with the overlocker certain things were a lot easier because I didn't have to worry about fraying.

I still have some material left so I might be able to squeeze a matching bolero jacket so fingers cross!

16 September 2017

Making a dress - Black and Pink JSK

Inspiration

My original inspiration is from this dress from pinterest.


Unfortunately the Taobao brand Magic Tea Party no longer make this JSK so I don't have anymore pictures of this dress

But a trail through the internet and I manged to find this photo.


Well it is a start.

Design

So I decided to sketch my dress.  Definitely wanted those pintucks at the front but no lacing at the back as I wanted a zip.

However just when I was happy with my design I had a change of heart and went with buttons down the front.  Not sure why I did but I think when I saw the pintucks I immediately then thought I wanted the top white part to look like a shirt.  Of  course I didn't want to add none functioning buttons so I change the design slightly to have button.


Pattern-wise this was my starting point.


It has the basic bodice I like and the pattern fits nicely.  All I need to do is convert this from an underbust JSK to an overbust one.

Seems easily enough.

Now what fabric to use.  Well I have this fabric sitting around for a while and I have been meaning to use this to make a lolita dress but I always thought I would use it to make a wa-lolita dress because of the pattern resembling yukata fabric.


And I get to use up some of my trimmings that I have been collecting.


I like my trimmings to be just visible for some reason and if I sew this black trim on the very edge you will be able to see it well enough.


Construction

The main fabric is cotton with my lining being anti-static polyester lining.  So cutting was pretty straightforward.  Unlike the last project.


Well that is all the pieces cut.

Lets get sewing.

Getting the front panels sorted first.  I thought I would be clever and use the overlocker to stitch down the thread used for gathering.  Unfortunately they didn't hold as well as I thought so a little bit of fudging was needed.  However they turned out nice enough.


Now I tackled the pintucks on the bodice by ironing them first and then sewing the stitching to keep them in place.  Don't they look pretty.


Now to put all the bodice pieces together.  First the outer fabric and then the lining.


And now we get to put the lining and main fabric bodice together.  Somehow I feel I did this wrong but it looks okay so lets not worry about it shall we.


Previously I would always have trouble keeping the pocket opening from staying together so I decided this time to hand stitch them closed and then when everything is finished I can open it all up.


And now we come to the fun part.  Gathering all this fabric for the skirt.  There is so much to gather as I have to do it for the outer and lining fabric, thank god I don't have additional frills.


There is a lot of fabric here but slowly does it.  Well I sewed as best as I could but I will tell you about them in the conclusion.

But don't worry though I got it all sewn down!

I luckily remembered to add the black trimming to the bottom of skirt before I attached it but I did forget to add the white trimming to the dress.  It was suppose to go inbetween the floral and black panels.  Oh great well I could not add them to the waist so that just leave one place.  Down the middle along the button panel.

This seemed like a good solution but it had a slight problem, I had to sew it 5mm away from the edge because I was going to add the button panel on top.  In the end I sewed the trimming down and then ironed my seam allowance on the button panel and then carefully sew it down to the edge.

Not looking bad but the finally hurdle is the buttons.


I was umming and arring about whether to do them on the machine or by hand.  Machine looks more professional but I had mixed results whereas handsewing them will take a lot of time.

I ended up using the machine as sewing 14 buttonholes seems a bit too many.

Finished

Here it is!


I still have some of the floral fabric so I may make a little bolero jacket to go with it.

Conclusion

Overall it went according to plan.

In hindsight I should not have made the front ruffles as I did.  There was just so much fabric there and made the front panel a bit stiff.


As always I am super critical in the finish.  I can see how some seams are not sewn nicely and things are just not that neat.  However I suppose this is the problem of making your own dresses.


Here the skirt slipped away from the bodice a bit.  Thank god the fabric is black.


Here you can see the tape that the trimming is attached to peeking through.

Roll on the next project!